amigurumi, Uncategorized

Egg Cozy Baby Yoda

Is not the Child the most adorable character of a TV show ever? I could not stop looking at him watching the series and now when the season is over, I miss him. So I crocheted one for me to think of baby Yoda when I am having a breakfast! As always: simple pattern, beginners are welcome! Join me if you miss baby Yoda, too!

IMG_20200122_161004

You will need:

  • 3,5 mm and 6 mm crochet hook (I have crocheted the head with the smaller hook so one cant see the fill)
  • light brown and green yarn
  • scissors
  • stitch marker
  • safety eyes (I had 5 mm)
  • sewing needle
  • black yarn to embroider the mouth
  • fiberfill

Abbreviations:

  • ch – chain
  • st – stitch
  • sl st – slip stitch
  • sc – single crochet
  • inc – 2 sc in 1 st
  • dec – crochet 2 st together
  • X N – repeat N times
  • at the end of every round total number of stitches is shown

If it is your first amigurumi attempt ever, you might want to have a look at my tricks for crocheting amigurumi and ideas for interesting amigurumi stuffing. I am sure you will find it helpful! Have fun crocheting!

The pattern

Good news first: now you can find nicecrocheting and my pattern on Instagram!

The body (light brown yarn):

Round 1: 5 sc in magic ring (5)
Round 2: inc X 5 (10)
Round 3: (sc in next st, inc) X 5 (15)
Round 4: (sc in next 2 st, inc) X 5 (20)
Round 5: (sc in next 3 st, inc) X 5 (25)
Rounds 6-12: sc in all st (25)

Fasten off, cut the yarn and weave in the end.

The head (green yarn):

Round 1: 6 sc in magic ring (6 )
Round 2: inc X 6 (12)
Round 3: (sc in next st, inc) X 6 (18)
Round 4: (sc in next 2 st, inc) X 6 (24)
Round 5-8: sc in all st (24)
Round 9: (sc in next 2 st, dec) X 6 (18)
Round 10: (sc in next 1 st, dec) X 6 (12)
Fasten off and cut the yarn leaving a tail for sewing the head to the body.

Ears (green yarn):

Round 1: 4 sc in magic ring (4)
Round 2: sc in all st (4)
Round 3: (2 sc in next st, sc in next st) X 2 (6)
Round 4: sc in all st (6)
Round 5: (3 sc in next st, sc in next 2 st) X 2 (9)
Round 6: sc in all st (9)
Fasten off and cut the yarn leaving a tail for sewing.

IMG_20200122_160729

Put the safety eyes in, sew the ears to the head, embroider the mouth and stuff the head. Your egg cozy is finished!!!

IMG_20200122_162629

Was it fun to crochet with this tutorial? Have a look at my other patterns, maybe you will find something you like there!

You may also like:

St. Valentine’s Day – 5 Crochet Gift Ideas for Him

IMG_20180126_095400

Uncategorized

Nicecrocheting on Instagram!

Hello dear friends!

I want to share great news with you: nicecrocheting is on Instagram now! It is very exciting and new for me so I need your support there as well!

If you like my patterns, want to be updated about my crochet ideas and want to know more about me – please follow me on Instagram!

Here is the link one more time: https://www.instagram.com/nicecrocheting/

I am very excited and motivated about new crocheting adventures with you and I am looking forward to the different forms of our communication!

IMG_20200228_203405

Screenshot_2020-02-29-18-04-33-857_com.instagram.android

amigurumi, Uncategorized

Cute Plush Bunny Crochet Pattern

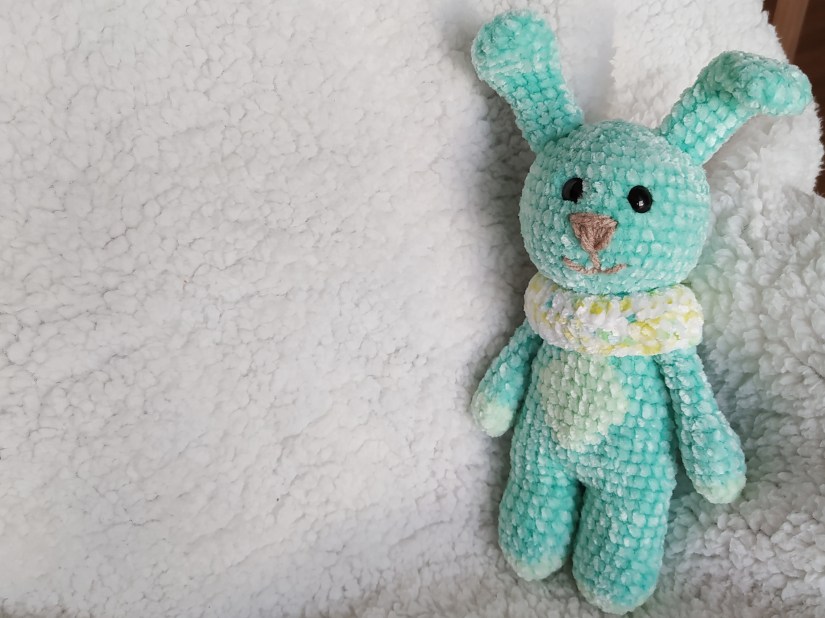
The free crochet pattern for the adorable bunny is here waiting for you! It’s very easy to make even with basic crochet skills but the result will look impressive, I promise! The bunny is so cute and stylish, perfect present for anyone!
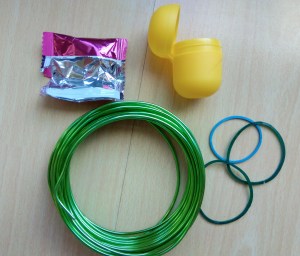
IMG_20200114_151946

You will need:

  • 3,5 mm crochet hook
  • stitch marker
  • light turquoise, turquoise and white (for the scarf, take any colour you like) yarn, also light brown yarn leftovers for the nose
  • safety eyes (I had 10 mm)
  • sewing needle
  • scissors
  • fiberfill

Abbreviations:

  • ch – chain
  • st – stitch
  • sl st – slip stitch
  • sc – single crochet
  • dc – double crochet
  • inc – 2 sc in one st (used to increase the number of stitches)
  • dec – 2 sc together (used to decrease the number of stitches)
  • X 6 – repeat 6 times
  • at the end of every round total number of stitches is shown

If it is your first amigurumi attempt ever, you might want to have a look at my tricks for crocheting amigurumi and ideas for interesting amigurumi stuffing. I am sure you will find it helpful! Have fun crocheting!

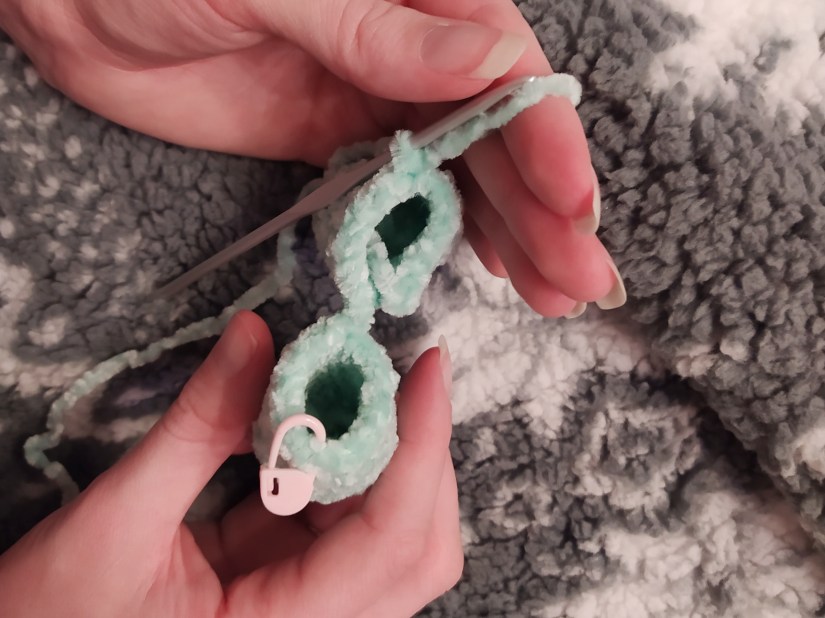
Legs + Body (start with light turquoise yarn):

Round 1: 6 sc in magic ring (6 )
Round 2: inc X 6 (12)
Round 3: (sc in next st, inc) X 6 (18)
Round 4-10: change to turquoise yarn; sc in every st (18) Fasten off, cut the yarn and weave in the end.
First leg is finished. Make the second leg exactly the same but do not cut the yarn, continue crocheting both legs together.
Round 11: sc in next 9 st, 1 ch, insert the hook in a st of the last round of the second leg and sc in next 18 st (around the whole leg), sc in next st (ch), sc in next 9 st, place the stitch marker here, it is the last st of the round (38)

IMG_20200110_215031

Rounds 12-15: sc in all st (38)

Round 16: sc in next 8 st, change to the light turquoise yarn (do not cut the turquoise yarn!), sc in next 3 st, change to turquoise yarn (do not cut the light turquoise yarn!), sc in next 27 st (38)

Round 17: sc in next 7 st, change to the light turquoise yarn (do not cut the turquoise yarn!), sc in next 5 st, change to turquoise yarn (do not cut the light turquoise yarn!), sc in next 26 st (38)
Round 18: sc in next 6 st, change to the light turquoise yarn (do not cut the turquoise yarn!), sc in next 7 st, change to turquoise yarn (do not cut the light turquoise yarn!), sc in next 25 st (38)
Rounds 19-20: sc in next 5 st, change to the light turquoise yarn (do not cut the turquoise yarn!), sc in next 9 st, change to turquoise yarn (do not cut the light turquoise yarn!), sc in next 24 st (38)

Round 21: dec, sc in next 3 st, change to the light turquoise yarn (do not cut the turquoise yarn!), sc in next 9 st, change to turquoise yarn (do not cut the light turquoise yarn!), sc in next 3 st, dec, sc in next 19 st (36)

Round 22: dec, sc in next 3 st, change to the light turquoise yarn (do not cut the turquoise yarn!), sc in next 7 st, change to turquoise yarn (do not cut the light turquoise yarn!), sc in next 3 st, dec, sc in next 19 st (34)

Round 23: dec, sc in next 3 st, change to the light turquoise yarn (do not cut the turquoise yarn!), sc in next 5 st, change to turquoise yarn (do not cut the light turquoise yarn!), sc in next 3 st, dec, sc in next 19 st (32)

Round 24: dec, sc in next 3 st, change to the light turquoise yarn (do not cut the turquoise yarn!), sc in next 3 st, change to turquoise yarn (now you can cut the light turquoise yarn, fasten it off), sc in next 3 st, dec, sc in next 19 st (30)

Round 25: dec, sc in next 8 st, dec, sc in 18 st (28)
Round 26: dec, sc in next 8 st, dec, sc in 16 st (26)
Round 27: dec, sc in next 8 st, dec, sc in 14 st (24)
Round 28: dec, sc in next 8 st, dec, sc in 12 st (20)
Fasten off and cut the yarn leaving a tail for sewing.

IMG_20200112_144449

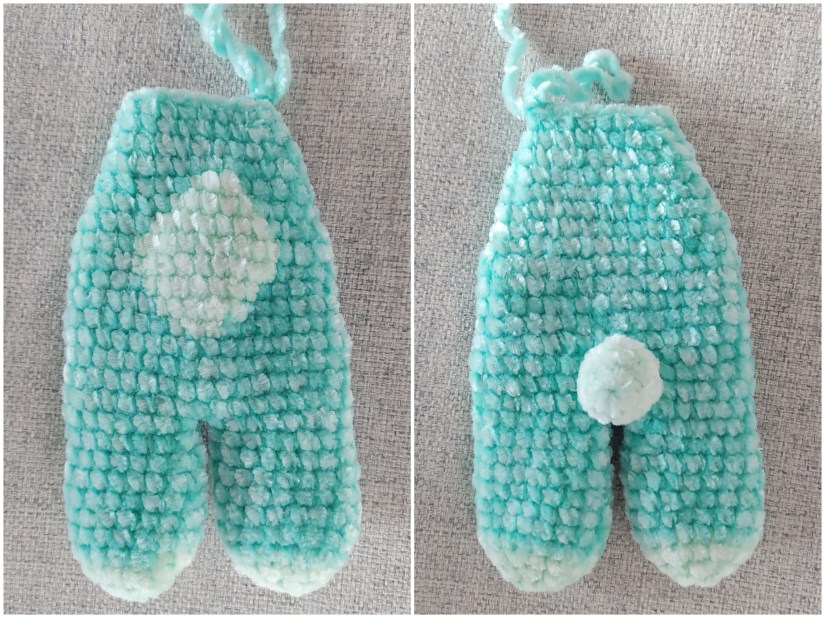
Tail (light turquoise yarn):

Round 1: 6 sc in magic ring (6 )
Round 2: (inc, sc in next st) X 3 (9)
Round 3: sc in all st (9)
Round 4: (dec, sc in next st) X 3 (6)
Fasten off and cut the yarn leaving a tail for sewing. Sew the tail to the body.

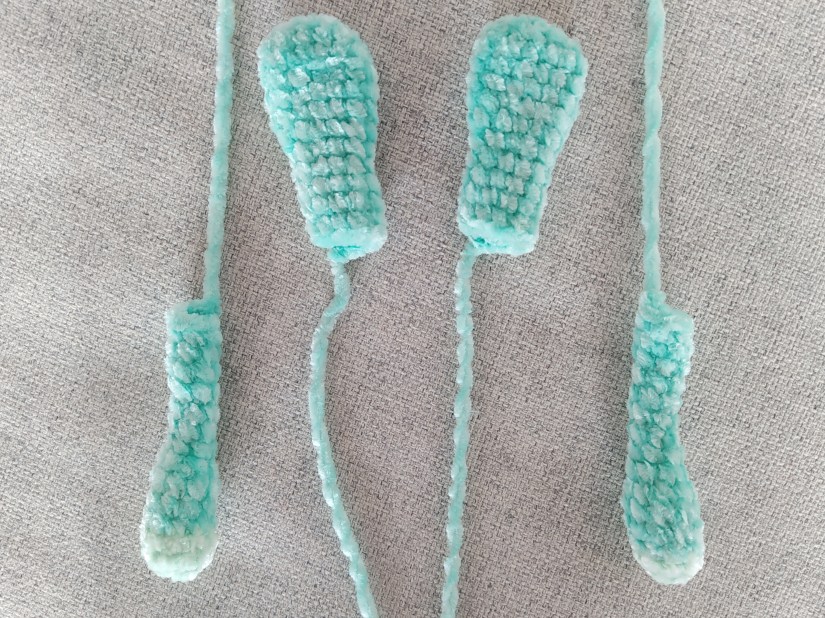
Arms (make 2, start with light turquoise yarn):

Round 1: 6 sc in magic ring (6 )
Round 2: (inc, sc in next st) X 3 (9)
Change to the turquoise yarn.
Rounds 3-5: sc in all st (9)
Round 6: (dec, sc in next st) X 3 (6)
Stuff the crocheted part of the arm.
Rounds 7-15: sc in all st (6)
Fasten off and cut the yarn leaving a tail for sewing.

Ears (make 2, turquoise yarn):

Round 1: 4 ch, 2 sc in the second from the hook, sc in next st, 3 sc in next st, sc in next 2 st (8)
Round 2: 3 sc in next st, sc in next 3 st, 3 sc in next st, sc in next 3 st (12)
Rounds 3-6: sc in all 12 st (12)
Round 7: (dec, sc in next 4 st) X 2 (10)
Rounds 8-12: sc in all st (10)
Fasten off and cut the yarn leaving a tail for sewing.

IMG_20200112_192623

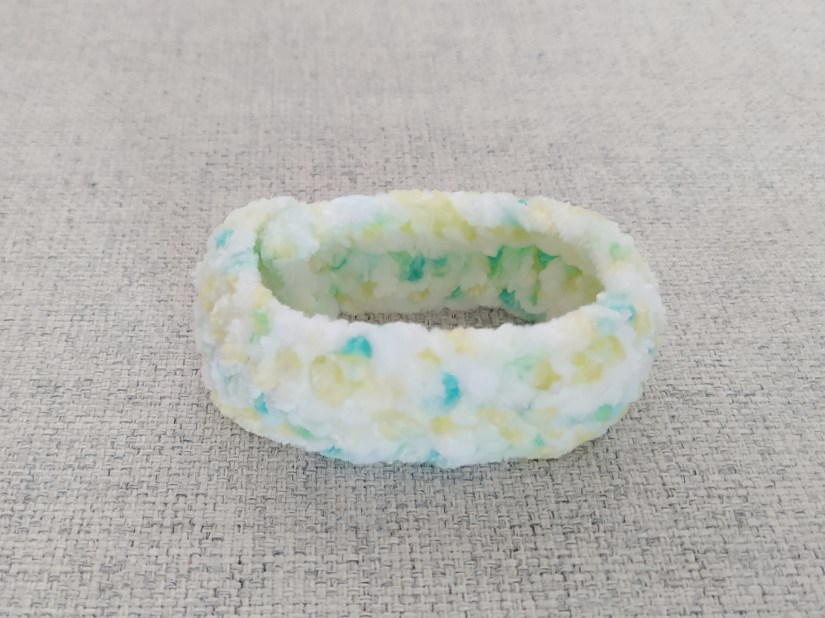
Scarf (turquoise yarn):

30 ch
Rounds 1-2: 3 ch,dc in all st
1 ch, join the scarf and crochet single stitches  through both sides. Fasten off, cut the yarn, weave in the end.

IMG_20200114_152533

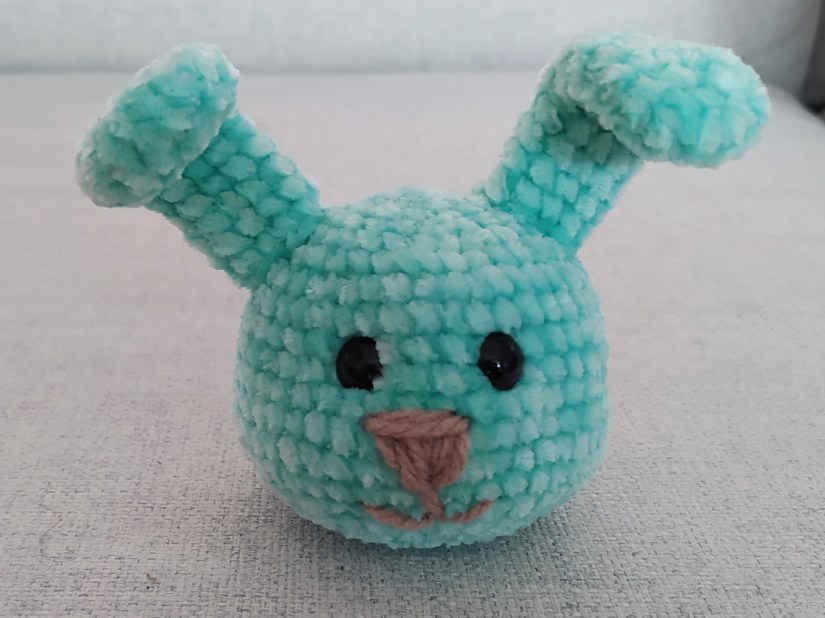
Head (turquoise yarn):

Round 1: 6 sc in magic ring (6 )
Round 2: inc X 6 (12)
Round 3: (sc in next st, inc) X 6 (18)
Round 4: (sc in next 2 st, inc) X 6 (24)
Round 5: (sc in next 3 st, inc) X 6 (30)
Round 6: (sc in next 4 st, inc) X 6 (36)
Round 7: (sc in next 5 st, inc) X 6 (42)
Rounds 8-14: sc in all st (42)
Round 15: (sc in next 5 st, dec) X 6 (36)
Round 16: (sc in next 4 st, dec) X 6(30)
Round 17: (sc in next 3 st, dec) X 6 (24)
Place the safety eyes (between the Rounds 9 and 10, 4 st between the eyes), embroider the nose and the mouth, sew the ears to the head.
Round 18: (sc in next 2 st, dec) X 6 (18)
Round 19: (sc in next st, dec) X 6 (12)
Round 20: (dec) X 6 (6)
Stuff the head and sew the last Round.

IMG_20200114_152615

Sew the arms to the body, stuff the body, put the scarf on the neck and sew the neck to the head. And the bunny is finished!

IMG_20200114_152437

Was it fun to crochet with this tutorial? Have a look at my other patterns, maybe you will find something you like there!

You may also like:

St. Valentine’s Day – 5 Crochet Gift Ideas for Him

IMG_20180126_095400


Uncategorized

St. Valentine’s Day – 5 Crochet Gift Ideas for Him

It’s January 14th and you have exactly one month to plan your perfect date or to prepare a small gift/surprise for your Valentine! Here I have 5 ideas for a small handmade gift. No matter who your boyfriend/husband/almost boyfried is – a sceptical, practical person or a romantic and sensitive guy – you can always find a perfect crochet match for him!

1) Heart

IMG_20180126_094733

Of course, a symbol of the most romantic day is always a heart! You can use it to decorate your place or a breakfast tray. Also you can place eyes on it and embroider a smile and he will get the cutest stuffed heart ever. Just a bit of imagination and the 3D heart pattern!

IMG_20180126_094912

For decorating you might want to make more of the small 2D hearts. Tutorial for that you can find here.

IMG_20180226_151238

2) Princess Leia

IMG_20180104_121905

If your beloved one is a Star Wars fan (even if he is disappointed by the last episodes), he will be happy to get a crocheted Princess Leia! It is creative and funny and he will be amazed by your talent! Besides, I am sure that Princess Leia was his first love 🙂

IMG_20180102_142849

3) Key Ring

If your boyfriend is a practical one and does not like things laying around, crochet a funny key ring for him! Maybe he likes sushi? Then this pattern is for you!

IMG_20180907_210623

4) Earwarmer

One more option for a practical man would be something he can wear. Why do not you make a earwarmer for him? Not a lot of work for you and he will stay warm!

IMG_20180225_124035

Especially useful for those guys, who bike a lot and do not use hats 🙂

IMG_20180225_214808

5) Nutcracker and Marie

Your second half has a romantic nature and he likes classical music? What can be more romantic than making a lovely couple: The Nutcracker and Marie? Their love story has become the classics and millions of people watch it every winter again and again.

IMG_20200113_173607

No matter what pattern you have chosen and how exactly it will turn out, I am sure: you present will be a great surprise because it was made with love!

Happy St. Valentine’s Day!

Did you like the article? Check out my other patterns here!

You may also like:

Adorable Plush Bunny Crochet Pattern

IMG_20200114_151946

Cupcake Box Free Crochet Tutorial with Pictures

IMG_20200104_212801


amigurumi, Uncategorized

The Nutcracker Story: Ballerina Marie Amigurumi Pattern

Inspired by the Nutcracker ballet! As Marie follows the Nutcracker to the beautiful Land of Sweets, her crocheted prototype appears after the Nutcracker pattern in my blog 🙂 By the way, this cute couple might be a perfect last minute Christmas gift for someone who loves the romantic story of Nutcracker.

IMG_20200112_131128

You will need:

  • 3,5 mm crochet hook
  • 2,5 mm crochet hook
  • light blue, brown, beige yarn (I have chosen the yarn in the way, that the blue yarn is thiner (matches to the 2,5 mm hook), and the beige yarn is one size thicker. This makes the waist proportions nicer)
  • red yarn leftovers for the mouth
  • a small piece of wire or a small scrunchy (for the hair bun) and a short decoration inkle
  • sewing needle
  • scissors
  • fiberfill

Abbreviations:

  • ch – chain
  • st – stitch
  • sl st – slip stitch
  • sc – single crochet
  • dc – double crochet
  • inc – 2 sc in one st (used to increase the number of stitches)
  • dec – crochet 2 sc together (used to decrease the number of stitches)
  • X N – repeat N times
  • at the end of every round total number of stitches is shown

If it is your first amigurumi attempt ever, you might want to have a look at my tricks for crocheting amigurumi . I am sure you will find it helpful! Have fun crocheting!

The Pattern:

Start with the light blue yarn.
Round 1: 6 sc in magic ring (6)
Round 2 – 3: sc in all st (6)
Change to the beige yarn.
Rounds 4 – 8: sc in all st (6)
Round 9: (sc in next st, inc) X 3 (9)
Rounds 10 – 12: sc in all st (9)
Round 13: (sc in next 2 st, inc)X 3 (12)
Round 14: sc in all st (12)
Change to the light blue yarn.
Round 15: in back loop only: sc in all st (12)
Rounds 16 – 19: sc in all st (12)
Round 20: sc in next 3 st, 3 sc in next st, sc in next 5 st, 3 sc in next st, sc in next 2 st (16)
Rounds 21-22: sc in all st (16)
Stuff
Round 23: sc in next 2 st, 2 ch, skip 4 st, sc in next 4 st, 2 ch, skip next 4 st, sc in next 2 st (12)
Round 24: (sc in next 2 st, dec) X 3 (9)
Change to the beige yarn.
Round 25: sc in all st (9)
Round 26: (sc in next 2 st, inc) X 3 (12)
Rounds 27-29: sc in all st (12)

Embroider the mouth (on the Round 26, red yarn) and eyes (between the Rounds 27 and 28, brown yarn) one stitch apart from each other. Stuff the head.

Round 30: (sc in next 2 st, dec) X 3 (9) Do not fasten off, cut the yarn leaving a tail for sewing.

Sew the last round. Fasten off, weave in the end.

The hairs (brown yarn): I have decided to not crochet the hairs but to use the yarn. For that I have prepared 12 yarn sheafs: each consists of three yarn pieces 10 cm long, knotted together on one end. Pull each sheaf through the head on the hair line (described below) in the way that the knots stay inside and the hairs look out. Use the crochet hook for that.

The hair line:

I started from the stitch above the left eye between the Rounds 28 and 29. And then we go from the left to the right. Then put the hair bunches in 4 more stitches of the round to. Afterwards we go 1 Round down and one stitch to the right, place the hairs (6 hair bunches are used until now). Then we again go 1 Round down and one stitch to the right, place the hairs (7), as well as to the three next st to the right (10). After that we move 1 Round up and 1 stitch to the right (11), again 1 Round up and 1 stitch to the right. And now the line is joined, we take all the hairs and shape them in a bun on the top of the head (using the wire or the scrunchy). Place the decoration inkle on the bun.

IMG_20200108_224932

Skirt (light blue yarn):

Crochet in the front loops of the last beige round. Insert the hook in the first loop, make 3 ch. Make it also in the beginning of the second round. Both rounds end with a sl st.
Round 1: 4 dc in all st
Round 2: keep crocheting this block until the round ends: (3 dc in next st, dc in next st).

IMG_20200108_224333

Arms (start with light blue yarn):
Place the crochet hook in the middle of a hole for the left arm, crochet around it (5 stitches: 4 st outside and 1 st at the neck), sl st, make 15 chain, cut the yarn.

IMG_20200108_224302
The right arm make in the same way but do not cut the yarn. Join with the last ch of the left arm, change to the beige yarn, make 50 chain and join to the 1st beige ch with a sl st. Fasten off, cut the yarn and weave in all ends.

Marie is finished! If you want her to get the love story she deserves, do not forget to crochet the brave charming Nutcracker (tutorial here)! Do not they look cute together?
IMG_20200112_131223

Did you like to crochet with the tutorial? Check out my other patterns here!

You may also like:

St. Valentine’s Day – 5 Crochet Gift Ideas for Him

IMG_20180126_095400

Cupcake Box Free Crochet Tutorial with Pictures

IMG_20200104_212801

Crochet Princess Leia – Step-by-Step Tutorial here!

IMG_20180102_222852

3 Simple Stuffings Which Make Your Amigurumi Special

IMG_20180202_161505

My Crochet Highlights 2019

IMG_20191229_171502