


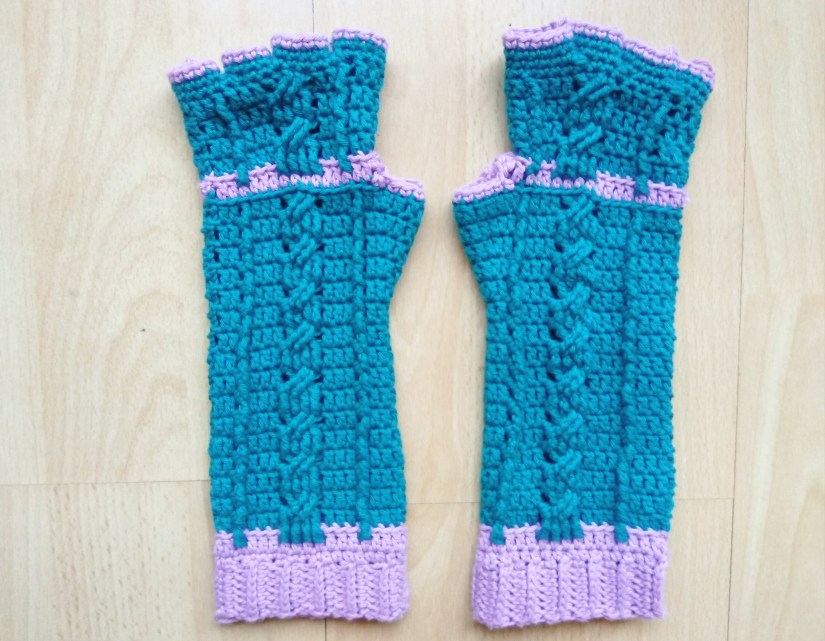
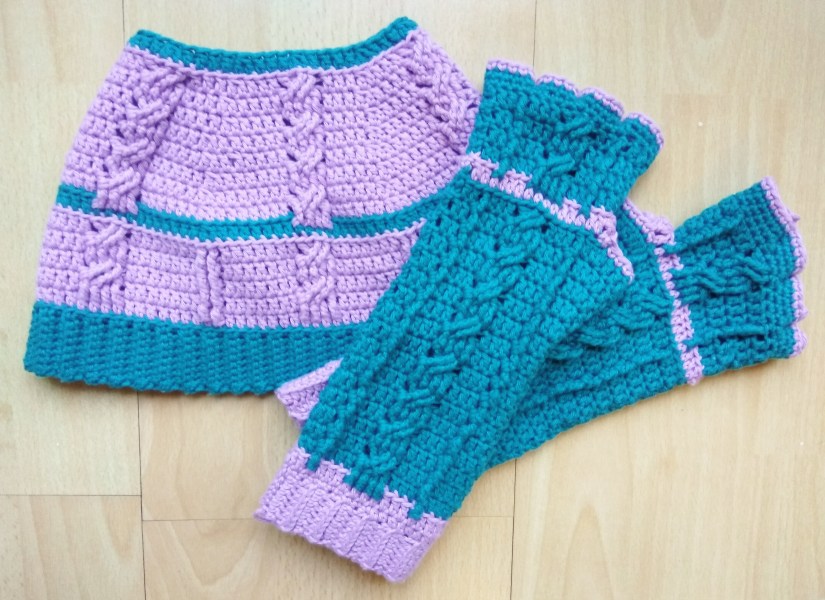
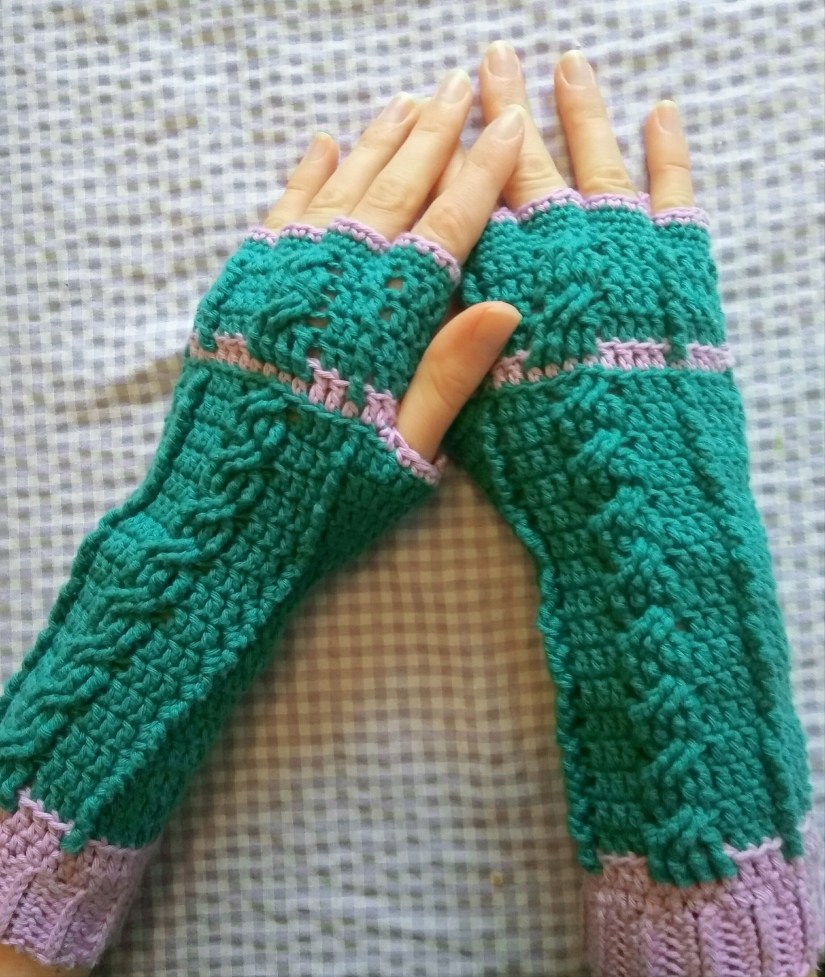
Yay, I finally finished the gloves! Practical and stylish, they are perfect for spring! Now I don’t have to take off my gloves every time I want to call someone or take a picture!
No more words, here is the pattern! I am very excited about it, I hope you will like it! I have never crocheted a cabled ornament before!
Materials:
- 3.5 mm crochet hook
- recommended for the hook light pink and turquoise yarn (I used 100% cotton 115 m = 50 g) and I needed 70 g for the gloves
- scissors
Abbreviations:
First of all I want to warn you to not get scared by the abbreviations you don’t know! The “difficult” or better to say new stitches will be explained in this tutorial! I am sure, after finishing this pattern you will be full of inspiration and you will want to use your new skills more and more, and maybe even design your own patterns!
- ch – chain
- st – stitch
- sl st – slip stitch
- sc – single crochet
- hdc – half double crochet
- dc – double crochet
- FPtrc – front post treble crochet (US crochet terms)
- exFPtrc – extended front post treble crochet (US crochet terms)
Ribbling (work with light pink yarn)
7 ch + 2 turning ch
Round 1: hdc in all st, 2 ch (7)
Round 2-23: hdc (through the lower st, explained below) in all st, 2 ch (7)
Round 24: hdc (through the lower st, explained below) in all at, 1 ch (7)
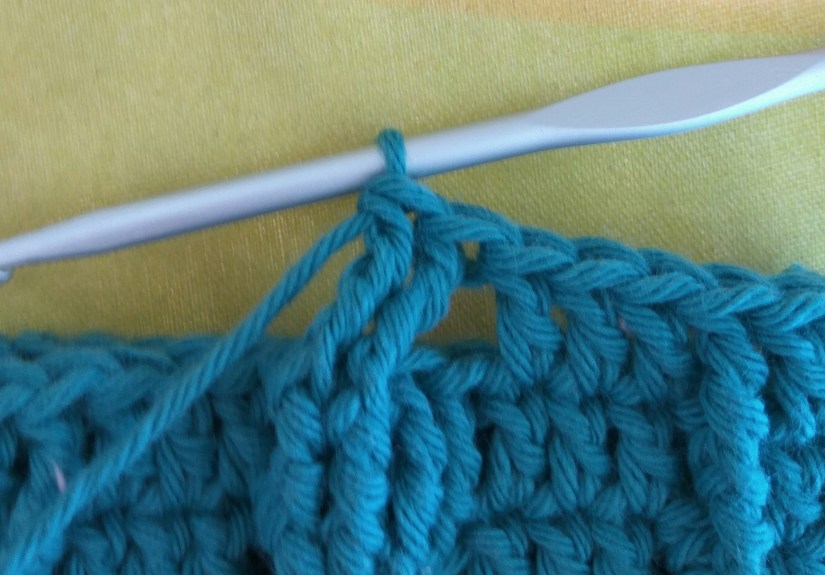
Fold the ribbling together, crochet through both the first and the last rows.
Round 25: sl st in all st (7)


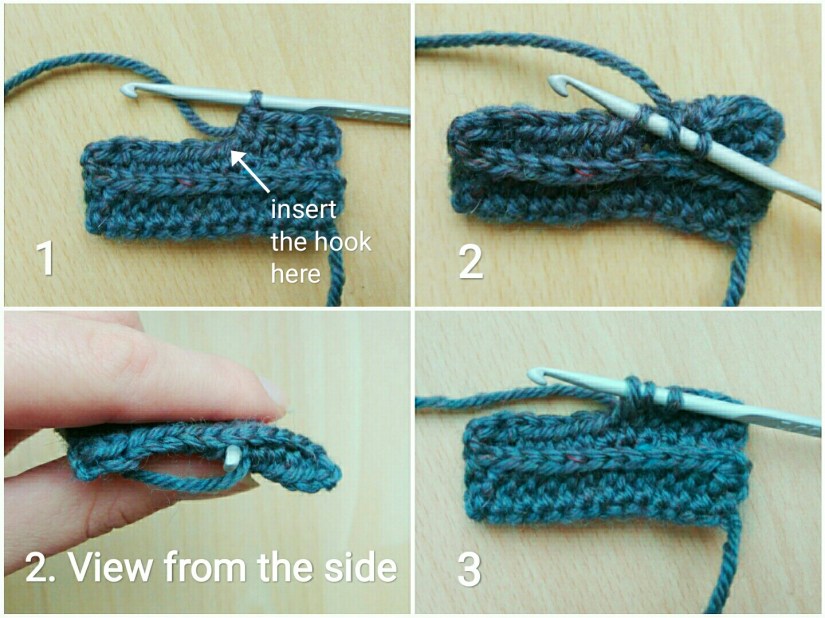
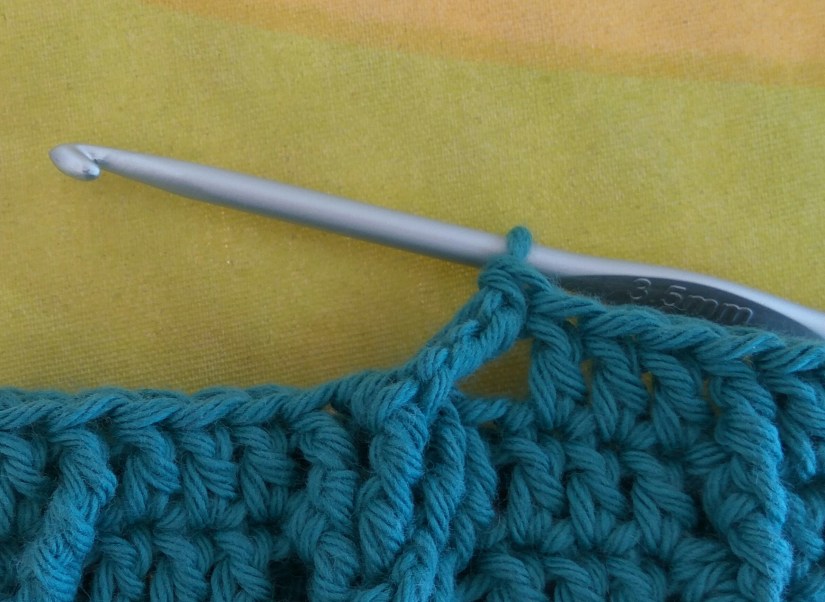
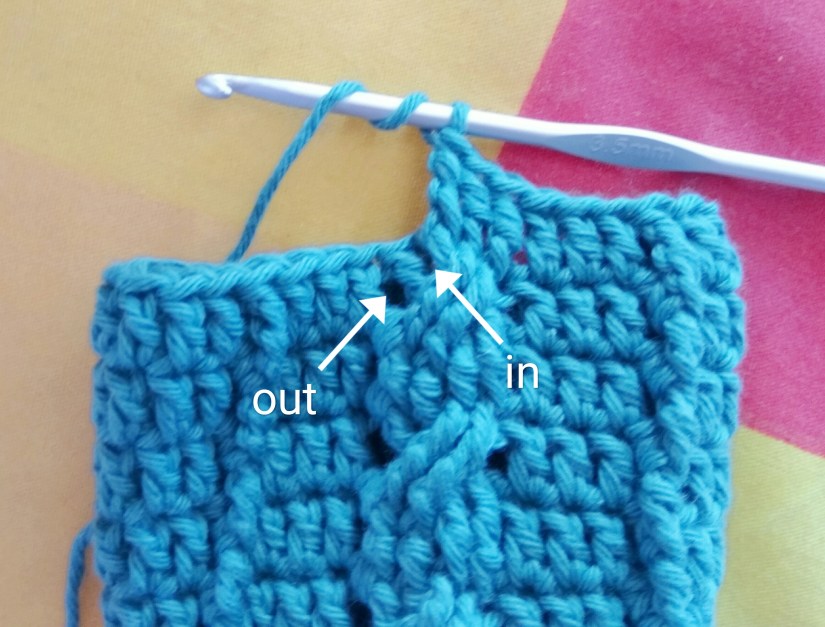
How to crochet the ribbling
It may look confusing when you start, but once you try you will see that it’s simple and very beautiful way to crochet a ribbing. I will explain now how it works and if you have more questions afterwards, you can also have a look at the tutorial.
While crocheting a row, insert the hook one stitch lower than the one you would normally use. It is shown in the picture below (N 2). As you can see there, you crochet always to the front part, that’s why the ribbing looks knitted.
Right Glove (continue with light pink yarn):
Round 1: 2 ch, 34 hdc on the side of the ribbling, sl st (34)
Round 2: 3 ch, dc in all st, sl st (34)
Change to turquoise yarn.
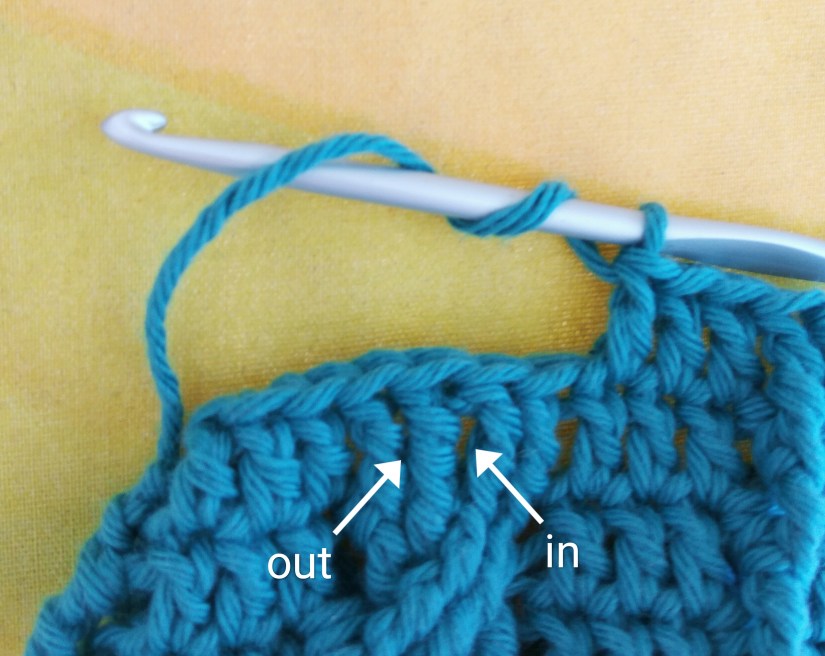
Round 3: 3 ch, dc in next 3 st in back loops only, exFPtrc in next st, dc in next 3 st in back loops only, exFPtrc in next 4 st, dc in next 3 st in back loops only, exFPtrc in next st, dc in next 19 st in back loops only, sl st (34)
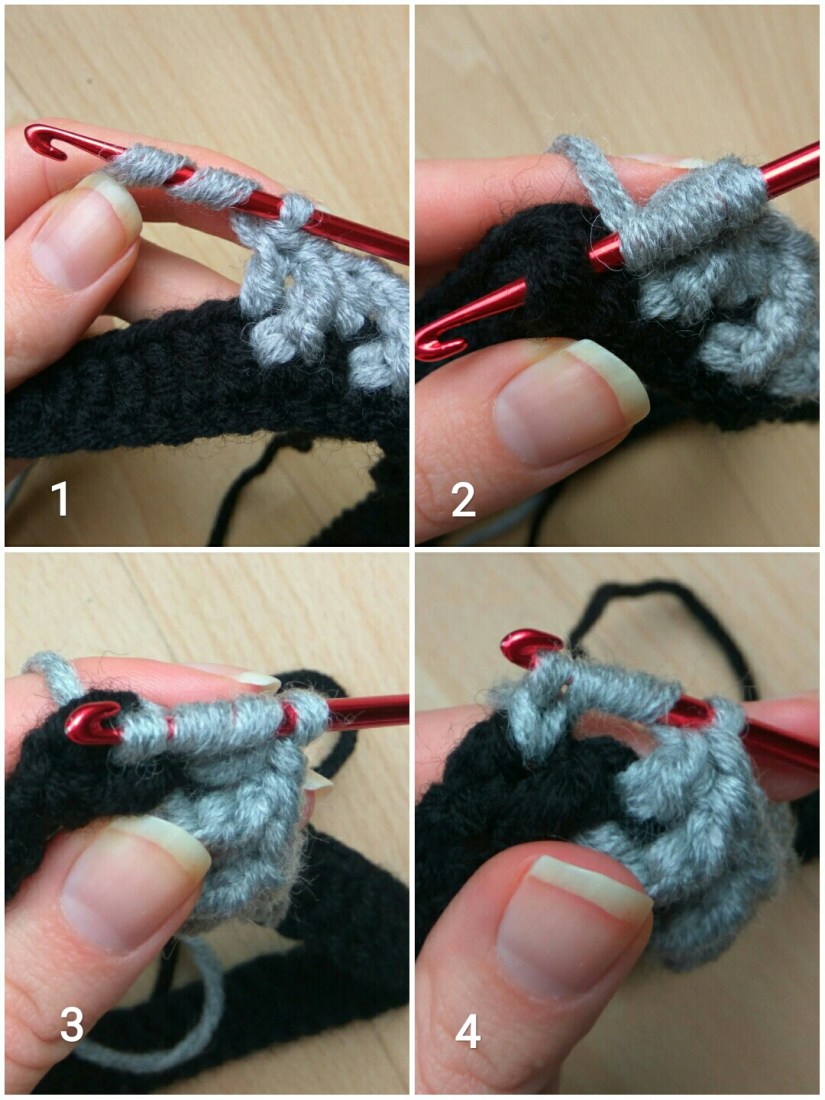
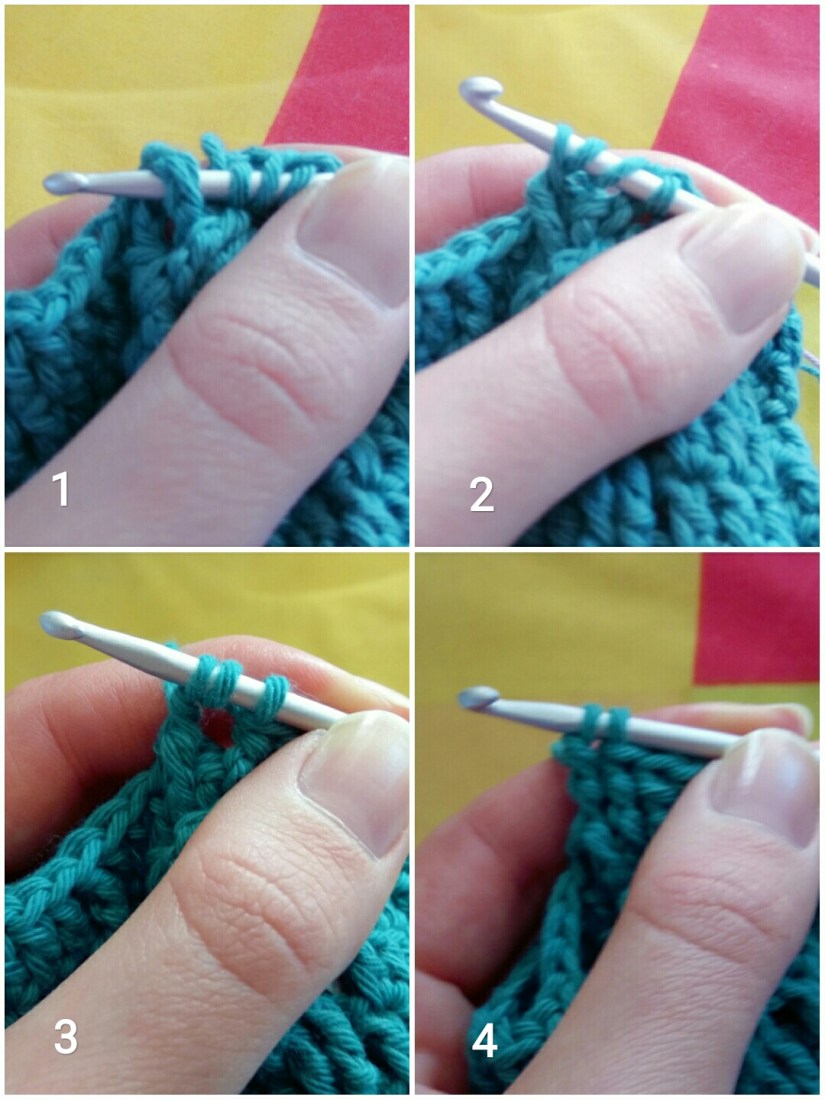
How to crochet exFPtrc:
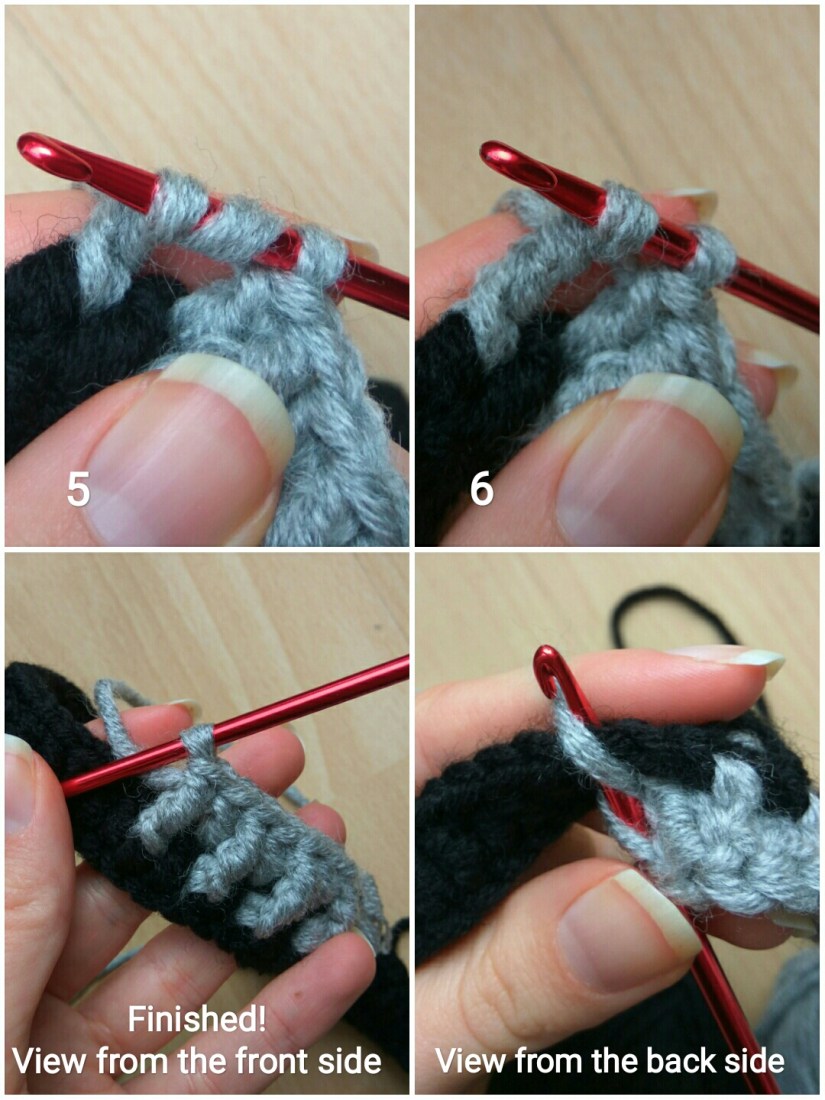
Yarn over twice (Picture 1), go through the next dc (Picture 2), yarn over and pull the hook through (Picture 3), you have 4 loops on the hook now. Yarn over and pull through the first loop on the hook (Picture 4).
Then yarn over again and pull though next two yarn loops, now you have tree loops left (Picture 5), yarn over and pull again though the next two yarn loops, now there are only two loops on the hook (Picture 6), the last step: yarn over and pull through both remaining loops. You just crocheted your first exFPtrc! Congratulations! Compare your result with the lower two pictures and follow the pattern further!
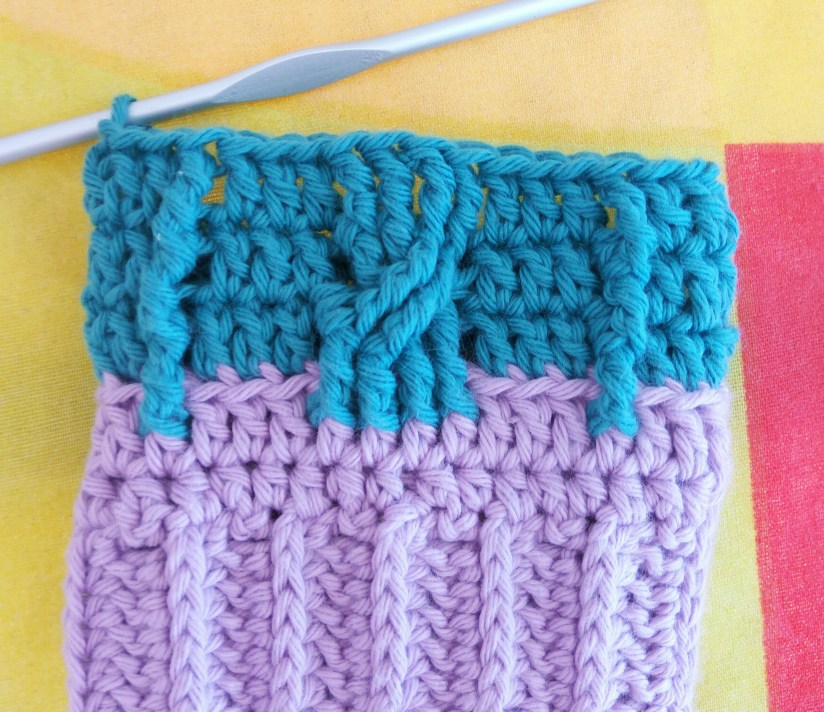
This is how the glove looks like after the 3rd round:


Round 4: 3 ch, dc in next 3 st, exFPtrc in next st, dc in next 3 st, skip 2 st, exFPtrc in the 3rd st (though the exFPtrc of the previous round, first two pictures below), exFPtrc in the next st (though the exFPtrc of the previous round, the 3rd picture below), exFPtrc in the first skipped st (though the exFPtrc of the previous round, the 4th picture below), exFPtrc in the second skipped st (though the exFPtrc of the previous round), dc in next 3 st, exFPtrc in next st, dc in next 19 st, sl st (34)
After making Round 4 the front side of the glove looks like that:
Round 5: 3 ch, dc in next 3 st, exFPtrc in next st, dc in next 3 st, FPtrc in the next 2 st (though the upper loop of the exFPtrc of the previous round, the first picture below), FPtrc in the next 2 st (though the exFPtrc of the previous round, this step is explained in the section “How to crochet FPtrc”), dc in next 3 st, exFPtrc in next st, dc in next 19 st, sl st (34)

How to crochet FPtrc:
Yarn over twice and go through the next exFPtrc (or generally any other stitch) of the previous round (Picture 1), yarn over and pull the hook through (Picture 2), you have 4 loops on the hook now. Yarn over and pull through the first two loops on the hook (Picture 3). Now yarn over again and pull through the next 2 loops on the hook (Picture 4). And last time: yarn over and pull through all 2 loops on the hook.
After the Round 5 the glove looks like that:
Rounds 6 – 13: We repeat Rounds 4 and 5 after each other 4 times each (34).
Further we basically crochet always the same two rounds but additionally we are making a space for the thumb. The new part is highlighted, everything else stays the same.
Round 14: 3 ch, dc in next 3 st, exFPtrc in the next st, dc in next 3 st, skip 2 st, exFPtrc in the 3rd st (though the exFPtrc of the previous round), exFPtrc in the next st (though the exFPtrc of the previous round), exFPtrc in the first skipped st (though the exFPtrc of the previous round), exFPtrc in the second skipped st (though the exFPtrc of the previous round), dc in next 3 st, exFPtrc in next st, dc in next st, 2 dc in next st, dc in next st, 2 dc in next st, dc in next 15 st, sl st (36)
Now we keep crocheting our two rows and at the same time increasing the thumb.
Round 15: 3 ch, dc in next 3 st, exFPtrc in next st, dc in next 3 st, FPtrc in the next 2 st (though the upper loop of the exFPtrc of the previous round), FPtrc in the next 2 st (though the exFPtrc of the previous round), dc in next 3 st, exFPtrc in next st, dc in next st, 2 dc in next st, dc in 3 next st, 2 dc in next st, dc in next 15 st, sl st (38)
Round 16: 3 ch, dc in next 3 st, exFPtrc in next st, dc in next 3 st, skip 2 st, exFPtrc in the 3rd st (though the exFPtrc of the previous round), exFPtrc in the next st (though the exFPtrc of the previous round), exFPtrc in the first skipped st (though the exFPtrc of the previous round), exFPtrc in the second skipped st (though the exFPtrc of the previous round), dc in next 3 st, exFPtrc in next st, dec in next st, 2 dc in next st, dc in next 5 st, 2 dc in next st, dc in next 15 st, sl st (40)
Round 17: 3 ch, dc in next 3 st, exFPtrc in next st, dc in next 3 st, FPtrc in the next 2 st (though the upper loop of the exFPtrc of the previous round), FPtrc in the next 2 st (though the exFPtrc of the previous round), dc in next 3 st, exFPtrc in next st, dc in next st, 2 dc in next st, dc in 7 next st, 2 dc in next st, dc in next 15 st, sl st (42)
Round 18: 3 ch, dc in next 3 st, exFPtrc in next st, dc in next 3 st, skip 2 st, exFPtrc in the 3rd st (though the exFPtrc of the previous round), exFPtrc in the next st (though the exFPtrc of the previous round), exFPtrc in the first skipped st (though the exFPtrc of the previous round), exFPtrc in the second skipped st (though the exFPtrc of the previous round), dc in next 3 st, exFPtrc in next st, dec in next st, 2 dc in next st, dc in next 9 st, 2 dc in next st, dc in next 15 st, sl st (44)
Round 19: Change to light pink yarn, 3 ch, dc in next 16 st in back loops only, 2 ch, skip next 11 st, dc in next 17 st in back loops only, sl st (35)
Round 20: 3 ch, dc in next 3 st in back loops only, exFPtrc in next st, dc in next 3 st in back loops only, exFPtrc in next 4 st, dc in next 3 st in back loops only, exFPtrc in next st, dc in next 20 st in back loops only, sl st (35)
Now we again repeat Rounds 4 and 5:
Round 21: 3 ch, dc in next 3 st, skip 2 st, exFPtrc in the 3rd st (though the exFPtrc of the previous round), exFPtrc in the next st (though the exFPtrc of the previous round), exFPtrc in the first skipped st (though the exFPtrc of the previous round), exFPtrc in the second skipped st (though the exFPtrc of the previous round), dc in next 3 st, exFPtrc in next st, dc in next 20 st, sl st (35)
Round 22: 3 ch, dc in next 3 st, exFPtrc in next st, dc in next 3 st, FPtrc in the next 2 st (though the upper loop of the exFPtrc of the previous round), FPtrc in the next 2 st (though the exFPtrc of the previous round), dc in next 3 st, exFPtrc in next st, dc in next 20 st, sl st (35)
Rounds 23-24: repeat Rounds 21-22 (35)

Now we crochet spaces for every finger:
Little finger:
Round 1: sc in next 5 st, 2 ch, skip next 25 st, sc in next 5 st (12)
Rounds 2-3: sc in all 12 st (12)
Round 4: change to light pink yarn,sc in all st (12)
Fasten off, cut the yarn and weave in the end.

Ring finger:
Round 1: Start crocheting the ring finger in the middle of the bottom of the little finger. Insert there the hook (as it is shown in the picture below), make 1 ch, sc in next st, dec (to make the corner smooth), sc in next 3 st, 2 ch, skip next 17 st, sc in next 3 st, dec, sc in next st (12)

Rounds 2-3: sc in all 12 st (12)
Round 4: change to light pink yarn, sc in all st (12)
Fasten off, cut the yarn and weave in the end.
Middle finger:
Round 1: Start crocheting in the middle of the bottom of the ring finger. Insert there the hook, make 1 ch, sc in next st, dec, sc in next 3 st, 2 ch, skip next 10 st, sc in next 3, dec, sc in next 2 st (13)
Rounds 2-3: sc in all 13 st (13)
Round 4: change to light pink yarn, sc in all st (13)
Fasten off, cut the yarn and weave in the end.
Forefinger:
Round 1: Start crocheting in the middle of the bottom of the middle finger. Insert the hook there, make 1 ch, sc in next st, dec, sc in next 8 st, dec, sc in next st (12)
Rounds 2-3: sc in all 12 st (12)
Round 4: change to light pink yarn, sc in all st (12)
Fasten off, cut the yarn and weave in the end.
Thumb:
Round 1: Start with light pink yarn on the bottom of the forefinger. Insert the hook there, make 1 ch, sc in next 10 st, dec, dc in next 3 st, sl st (14)
Fasten off, cut the yarn and weave in the end.
The first glove is finished! Now we crochet the left glove in a similar way. The difference is that we first crochet the side and then the front part.
Left glove:
So, first 2 Rounds are exactly the same, the difference starts in the 3rd Round.
Round 3: 3 ch, dc in next 19 st in back loops only, exFPtrc in next st, dc in next 3 st in back loops only, exFPtrc in next 4 st, dc in next 3 st in back loops only, exFPtrc in next st,dc in next 3 st in back loops only, sl st (34)
As you can see, we first crochet the regular 19 dc, and only afterwards the “main” pattern. Beside that the left gloves is made exactly like the right glove. Follow the description above but make the ornament at the position we started it in the Round 3.
The gloves are finished!
I also have made a hat matching the gloves. The pattern is here!
If you liked this tutorial, maybe you should have a look at my other patterns! Enjoy crocheting and have fun!

2 thoughts on “Crochet Long Fingerless Gloves”