Uncategorized

Five little amigurumi tips that are rarely mentioned in patterns

Have you been wondering why amigurumi toys look so accurate and nice on pictures but yours look… tired? Today I want to share with you couple of tricks which are very helpful for crocheting amigurumi. These things are usually not mentioned in tutorials and patterns!

  1. Use smaller hook than it’s indicated on the yarn label! Otherwise fibelfill can look through the holes, which is especially unfortunate if your toy is dark coloured.
  2. Crochet in a spiral (without a standart slip stitch at the end of every round). Then the boarders between rounds will be not visible and your toy will look smooth.
  3. When decreasing the number of stitches in a round, insert the hook only in front loops of the stitches.
  4. Do you have a lot of leftover yarn after cutting tails away? Keep them and use them to stuff small parts of a toy like arms and ears. After a while it will save you plenty of materials!
  5. Cannot decide what size of the eyes to use and where they should be located? Just make the eyes from the paper first and try it on! Then mark the stitches and insert safety eyes! Your amigurumi will get a lovely face!

I hope my little secrets with help you and now you will enjoy crocheting even more!
Have fun!

IMG_20171212_093625

Did you find the article helpful? Have a look at my other patterns, maybe you will find something you like there!

Uncategorized

Crochet Cute Baby Rattle Jellyfish, Step-by-step Tutorial with Pictures!

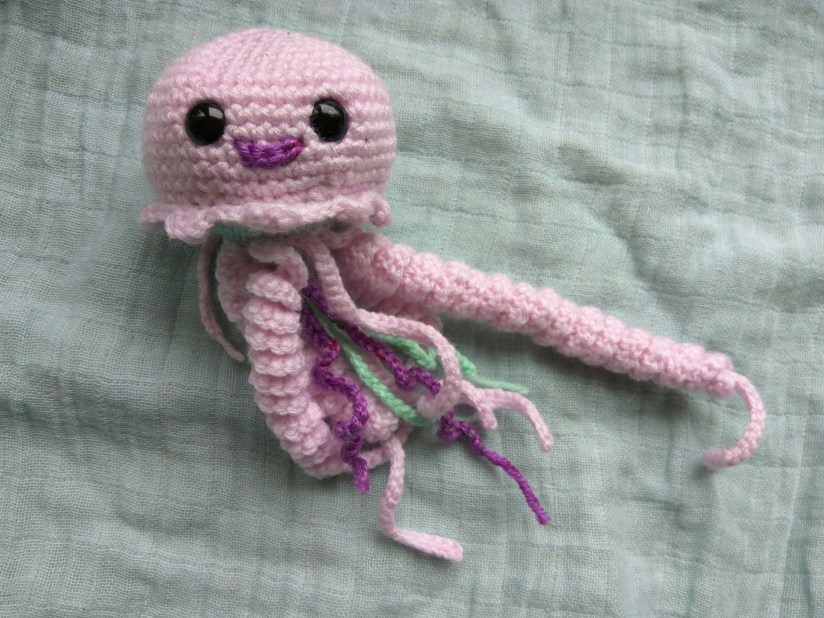
The first toy is very important and it is soooo nice to watch your baby play with its “friend” which is made by you! No doubts: the first toy of a baby has to be made by its mom! But what is the best toy for a newborn? Something soft, sweet looking, not too small, not too big, not dangerous, something the baby can hold and shake 😉 This adorable jellyfish rattle is definitely a perfect idea!

The free crochet pattern is here waiting for you! It’s very easy to make even with basic crochet skills but the result will look impressive, I promise!

You will need:

  • 3 mm crochet hook
  • yarn of three different colours (this is optional, one colour would be enough, too. I made the bottom part and tentacles of different colours. One needs only a little yarn for that – perfect opportunity to use leftover yarn!)
  • safety eyes (I had 10 mm)
  • sewing needle
  • scissors
  • Kinder Surprise plastic egg (or any other small container) and two coffee beans
  • fiberfill

Abbreviations:

  • ch – chain
  • st – stitch
  • sl st – slip stitch
  • sc – single crochet
  • dc – double crochet
  • inc – 2 sc in one st (used to increase the number of stitches)
  • dec – 2 sc together (used to decrease the number of stitches)
  • X 6 – repeat 6 times
  • at the end of every round total number of stitches is shown

Bottom part:

Round 1: 6 sc in magic ring (6 )
Round 2: inc X 6 (12)
Round 3: (sc in next st, inc) X 6 (18)
Round 4: (sc in next 2 st, inc) X 6 (24)
Round 5: (sc in next 3 st, inc) X 6 (30)
Round 6: (sc in next 4 st, inc) X 6 (36)
Round 7: (sc in next 5 st, inc) X 6 (42)

1

Upper part:

Round 1: 6 sc in magic ring (6 )
Round 2: inc X 6 (12)
Round 3: (sc in next st, inc) X 6 (18)
Round 4: (sc in next 2 st, inc) X 6 (24)
Round 5: (sc in next 3 st, inc) X 6 (30)
Round 6: (sc in next 4 st, inc) X 6 (36)
Round 7: (sc in next 5 st, inc) X 6 (42)
Round 8: (sc in next 6 st, inc) X 6 (48)
Round 9-14: sc in all st
Round 15:(sc in next 6 st, dec) X 6 (42)
Don’t cut the yarn!

2

Now you can make a lovely face for your jellyfish: insert the safety eyes and embroider a mouth!

Joining the upper and the bottom parts + tentacles:

Insert the hook through both layers.

3b

Round 16: (sc, in next st: (sc + 3 dc + sc), sc in next 3 st) – repeat it till the half of the round!!! It’s time to stuff the body and to insert the tentacles.

IMG_20171224_071427

By the way, it’s the last moment when you can insert the safety eyes and embroider a mouth! I actually forgot about it before so I will do it now:

10

Put it to the side for now and take a differently coloured yarn. From now on you can feel free to be creative and to not stick to the pattern. Its tentacles are the things which make your jellyfish individual and special.
Here I show how I made them, but as I said you can just play with colours and lengths however you like!

Crochet a chain of the bottom part colour and two more chains of the third colour (or the other way around). The lengths are between 40 and 100 stitches. The more different lengths are there, the more interesting the tentacles will look!

6

Using the hook insert the chains in the middle of the magic ring in the bottom part and pull them through halfway.

IMG_20171223_203753

Pull the three ends which are inside through the bottom part between rounds 1 and 2. Place the coffee beans in your contrainer and put it inside the jellyfish, stuff the body with the fiber. Finish the round 16.

Insert the hook between the 3rd and 4th rounds. Crochet 50 chains und one more chain for turning, crochet back making 3 single crochets in every stitch till the beginning of the chain. Then make 3 slip stitches on the bottom part and crochet a chain (70+1 ch) again.

This time crochet 3 DOUBLE crochets in every stitch (the tentacle will be a bit bigger than the one before). Make 3 slip stitches on the bottom part and crochet a third chain (70+1 ch). Crochet SLIP STITCH in every stitch (the tentacle will be thin, only slightly twisting).

Now the half of the round is over and you have 3 different tentacles. Repeat it one more time and at the end you will have 6 tentacles (2 of every kind). Cut the yarn, weave in all ends.

The jellyfish is finished!!! I am sure, you baby will love it!

214

Was it fun to crochet with this tutorial? Have a look at my other patterns, maybe you will find something you like there!

Uncategorized

Crochet Baby Wristbands together!

Can you imagine, doctors tell that the optimal room temperature for babies is around 17°! And for safety reasons they have no blankets, brrrr!
So their little hands are always cold and unfortunately this is normal.
Sometimes it helps to put socks on the baby’s hands to warm them, but often babies don’t want to wear socks. It’s so much fun to discover your own hands and play with your fingers!
Only few people know that the problem can be easily solved by using wristbands!
I know, it sounds unbelievable but it works really good and it takes not more than an hour to crochet them!

The pattern is available on Instagram!

The pattern is extremely simple!

You need a hook (3 mm), yarn and scissors. Let’s start! Bas
1. Crochet 14 + 1 turning chain (ch). This will be the width of the wristband.
For babies the optimal width should be about 11 ch – 16 ch (using a 3 mm hook and corresponding yarn).

2. So here you turn to the second row. When crocheting, insert the hook in the BACK LOOP ONLY! This will make you wristbands stretchable.

10
3. Then every next row just keep crocheting in the back loop of the stitch.
Don’t forget to make one turning chain at the end of every row.
Now you should choose the length of the wristband. For a little baby that would be about 22-27 rows, I made 24.
4. Now we will close the wristband. Make one turning chain, insert the hook in the back loop of the last stitch and the last stich of the first row. Make single crochet, keep going till the end of the row.
Yoohoo, the wristbands are finished! Fasten off and cut the yarn proudly! I love this moment 🙂

As you see it’s very easy. You can make the wristband look more special adding more colours for example.
If you decide to make stripes, think of a nice way to change yarns. If you don’t know any yet, here is extremely helpful article about it!

If you want your wristbands look more complicated and elegant, you can try something like that:

11
I tried to make them look like they were knitted 🙂

How to make it:
1. Crochet 11 rows as explained above.
2. Make 1 turning chain and single crochets in two next stitches (in both loops of every stitch, how it’s usually done).
3. Start making double crochet but insert the hook one row lower and one stitch to the right from the point you are at. Pull the yarn through the stitch and make it one more time.
So you have 5 loops on the hook now! Pull the yarn through all of them and make a single crochet in the next stitch.

IMG_20171222_220641
You have there one fat yarn bobble! Make four more and crochet last two stitches of the row (if you have different size, adjust the amount of the “bobbles”).

14
4. Crochet the next row exactly the same and you get the cones which look to the other direction.
5. Crochet 11 rows like a first half of the wristband.
6. Connect the wristband, fasten off and cut the yarn!
Finished!

16

Please, don’t forget to wash your new beautiful baby wristband! They will be in the baby’s mouth most of the time! 🙂

Was it fun to crochet with this tutorial? Have a look at my other patterns, maybe you will find something you like there!


Uncategorized

Anyone can crochet!

Hi, welcome to my blog about crocheting!

I will share here with you my ideas, inspiration and patterns!
I really love crocheting, especially recently when I became a mom, hehe 🙂 It’s a perfect hobby for the time with a baby: Relaxing and satisfying, at the end you produce something nice or/and useful!
Your baby needs a lot of little cute things like toys, clothes, and accessories and it’s so great if these things are made by its mom  with a lot of love!

And good news are: 1) One can crochet literally anything! Useful things, useless things, funny characters from TV shows or even someone you know! There are tons of things you can make as a gift for someone you love! 2) Crocheting is really easy. Anyone can crochet!
I believe, even if you never tried it before you will love it once you start.
All patterns I post here are for beginners!

Let’s get started!

IMG_20171227_135327