Uncategorized

Baby Yoda with a PhD Hat

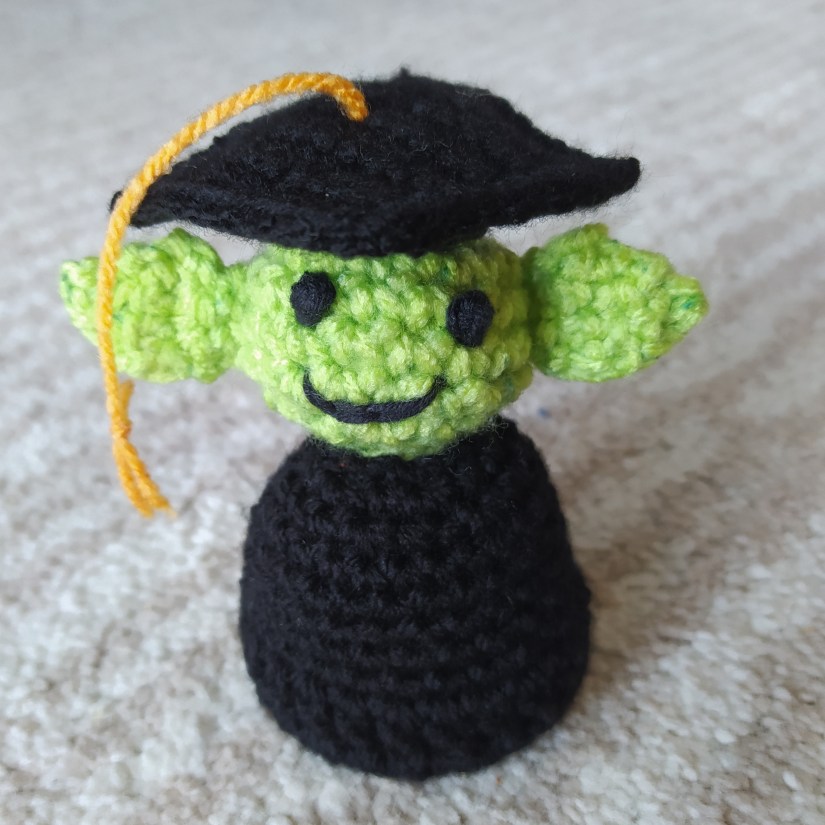
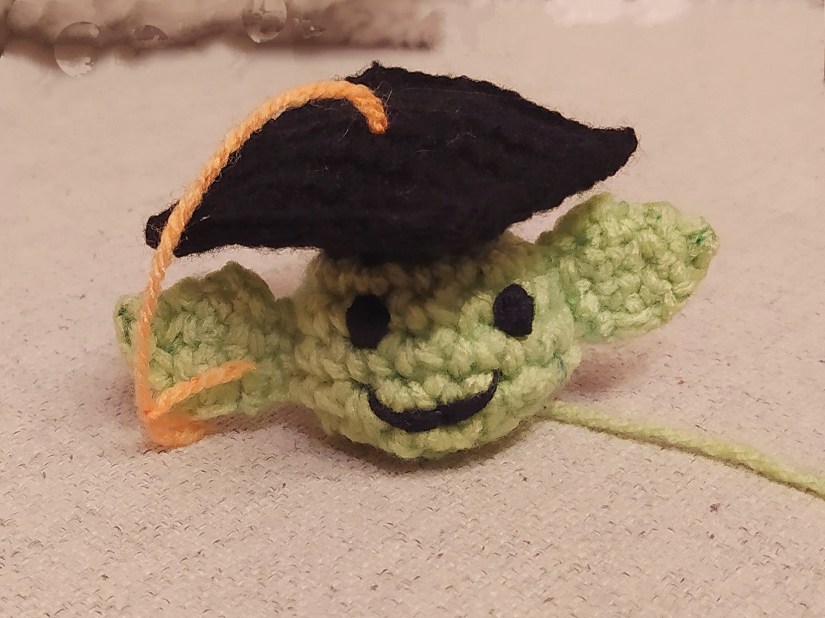
This one was a gift for a friend of mine, who had his PhD defense during the quarantine. Of course, no guests were allowed and he was supposed to wear a community mask as well as the professors!

You will need:

  • 3,5 mm and 6 mm crochet hook (I have crocheted the hat top with the smaller hook to make it harder and more stable)
  • black, white and green yarn, yellow string for the hat
  • scissors
  • stitch marker
  • 5 mm safety eyes (I crocheted them, using thiner black yarn)
  • sewing needle
  • fiberfill (I used yarn leftovers to stuff)

Abbreviations:

  • ch – chain
  • st – stitch
  • sl st – slip stitch
  • sc – single crochet
  • inc – 2 sc in 1 st
  • dec – crochet 2 sc together
  • X N – repeat N times
  • at the end of every round total number of stitches is shown

If it is your first amigurumi attempt ever, you might want to have a look at my tricks for crocheting amigurumi and ideas for interesting amigurumi stuffing. Also there are some tips how to crochet “zero waste”.I am sure you will find it helpful! Have fun crocheting!

IMG_20200422_090119

The pattern

Good news first: now you can find nicecrocheting and my pattern on Instagram!

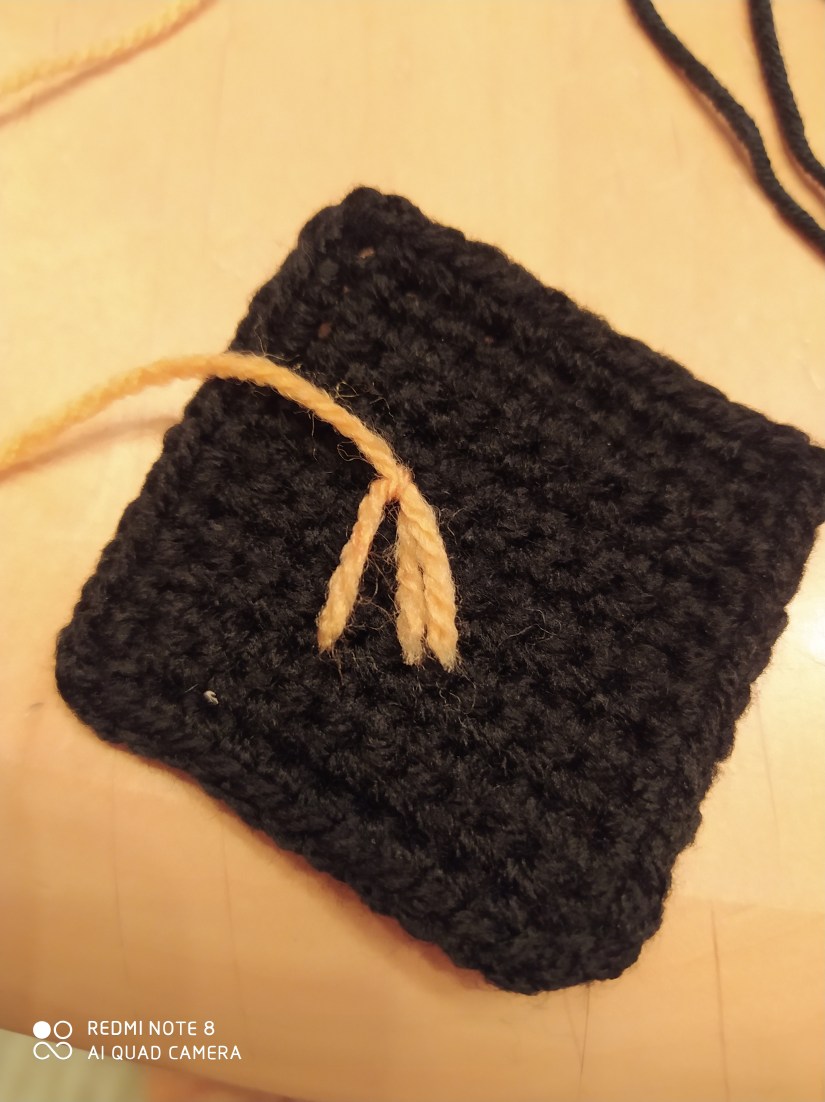
The hat sides (black yarn):
ch 10, sl st
dc in all 10 st, sl st, fasten off and cut the yarn leaving a tail for sewing.

IMG_20200421_200435

The hat top (black yarn, smaller hook):
12 ch
Rounds 1-12: sc in all st, 1 ch, turn (11)
Crochet around the square one time with sc.
Fasten off and cut the yarn, weave in the ends.
Pull a yellow string through the centre of  the square.

IMG_20200421_204210

Ears (green yarn, make two):
ch 4
Round 1: sc in the 2 nd from the hook st, sc in next 2 st (3)
Round 2: sc in all st (3) 1 ch turn
Round 3: inc in next st, sc in next st, inc in next st (5) 1 ch turn
Round 4: dec in next st, sc in next st, dec in next st (3) 0 ch turn
Round 5: dec sl st (2) 0 ch turn
Round 6: skip 1 st, sc in next st (1) 1 ch
Fasten off and cut the yarn leaving a tail for sewing.

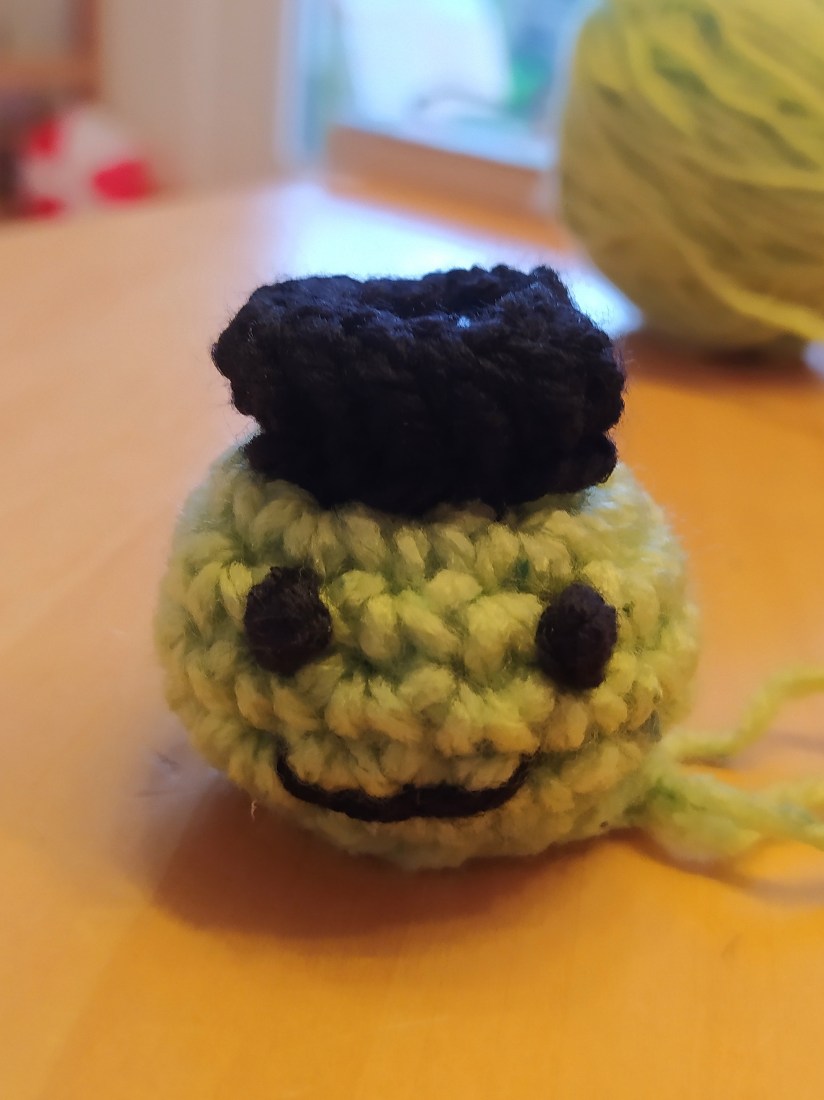
The head (green yarn):
Round 1: 6 sc in magic ring (6 )
Round 2: inc X 6 (12)
Round 3: (sc in next st, inc) X 6 (18)
Round 4-6: sc in all st (18)

Sew the hat sides, ears to the head, insert the safety eyes.
Round 7: (sc in next 1 st, dec) X 6 (12)
Fasten off and cut the yarn leaving a tail for sewing the head to the body.
Embroider the mouth using black yarn.

IMG_20200421_212935

The body (black yarn):

Round 1: 6 sc in magic ring (6)
Round 2: inc X 6 (12)
Round 3: (sc in next st, inc) X 6 (18)
Round 4: (sc in next 2 st, inc) X 6 (24)
Rounds 5-10: sc in all st (24)
Round 11: dc in all st (24)

Bottom part of the body (black yarn):
Round 1: 12 dc in magic ring (12)
Round 2: (2 dc in next st) X 12 (24)
Fasten off, cut the yarn leaving a tail for sewing.

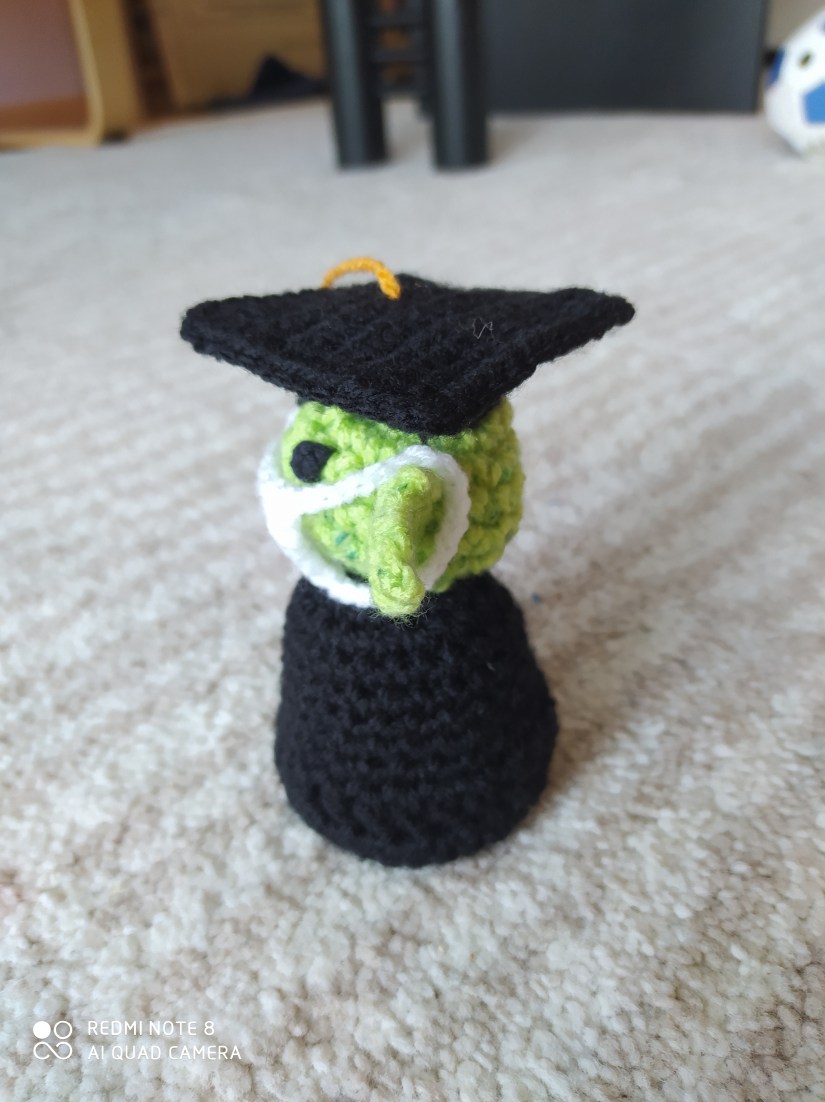
Stuff the head, sew it to the body. Stuff the body and “close” it sewing the bottom part.
Sew the top part of the hat to the hat sides from the top, weave in all ends.

Because of the current situation, you should take care fo your baby Yoda and make a community mask for him.

Community Mask (white yarn):
8 ch
dc in the 2nd st from the hook, dc in next 5 st (6) 2 ch, turn
dc in next 6 st, 21 ch, insert the hook on the right bottom corner of the mask, sc in next 6 st, 21 ch, join with the last corner. Fasten off, cut the yarn and weave in all ends.

IMG_20200422_090147

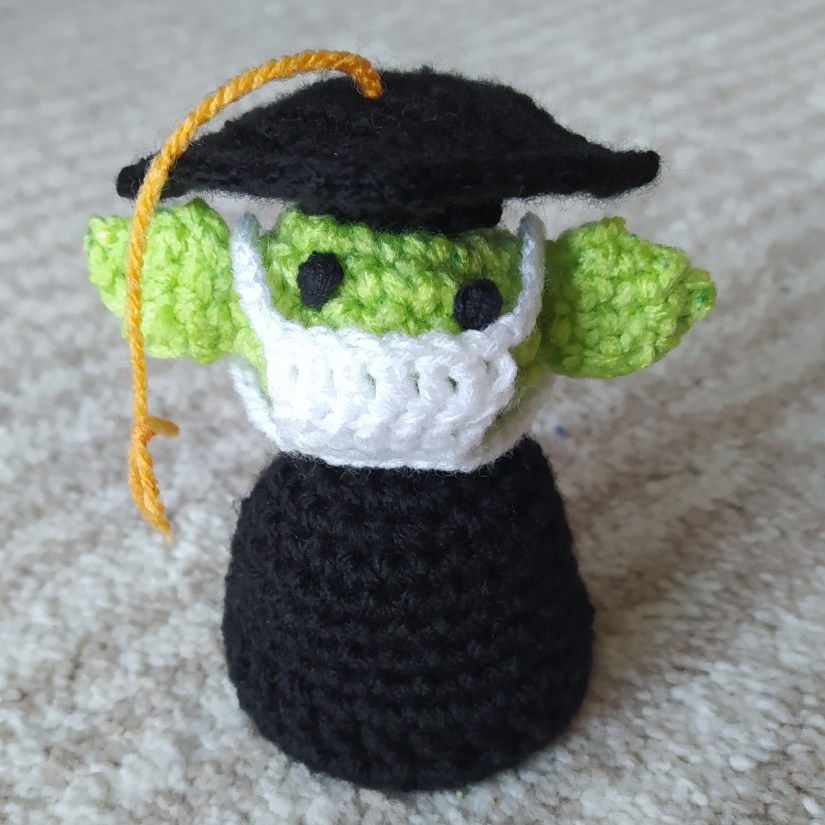
Your Dr. Baby Yoda is finished!!! Congrats!

IMG_20200422_085040

Did you like to crochet with this tutorial?
Have a look at my other patterns, maybe you will find something you like there!

You may also like:

Zero Waste Crochet

IMG_20180202_153126

Crochet Reusable Cosmetic Pads

IMG_20200321_144042

Uncategorized

Last Minute Easter Decoration: Crocheted Egg

If you have not enough time to order any Easter decorations and shops are closed, grab your hook, couple of actual eggs and save the situation!

IMG_20200410_134623

You will need:

  • 3,5 mm crochet hook
  • stitch marker
  • velvet yarn
  • scissors
  • an egg

Abbreviations:

  • ch – chain
  • st – stitch
  • sc – single crochet
  • inc – 2 sc in one st (used to increase the number of stitches)
  • dec – 2 sc together (used to decrease the number of stitches)
  • X 6 – repeat 6 times
  • at the end of every round total number of stitches is shown

First prepare the egg:
Make two small holes in the egg and blow in one of them to get out the insights of egg (hold the egg over a plate while doing that). Put the egg in an egg holder for an hour so the leftover eggwhite can drop out.

IMG_20200410_135444

The pattern:
Round 1: 6 sc in magic ring (6 )
Round 2: inc X 6 (12)
Round 3: (sc in next st, inc) X 6 (18)
Round 4: sc in all st (18)
Round 5: (sc in next 2 st, inc) X 6 (24)
Round 6: sc in all st (24)
Round 7: (sc in next 3 st, inc) X 6 (30)
Rounds 8-10: sc in all st (30)
Round 11: (sc in next 3 st, dec) X 6 (24)
Round 12: sc in all st (24)
Place the egg in the crochetness, we will crochet around the egg from now on.

IMG_20200409_144836
Round 13: (sc in next 2 st, dec) X 6 (18)
Round 14: sc in all st (18)
Round 15: (sc in next st, dec) X 6 (12)
Round 16: (3 sc together) X 4 (4)
Fasten off, cut the yarn and pull the end in the egg. That’s it!

IMG_20200409_150804

Enjoy the Easter days!

IMG_20200410_134537

Did you like to crochet with this tutorial?
Have a look at my other patterns, maybe you will find something you like there! And don’t forget to check out my Instagram @nicecrocheting!

You might also like:

Adorable Plush Bunny Crochet Pattern

IMG_20200114_151946

Rainbow – We are Staying Home! Free Crochet Pattern

IMG_20200404_140658

My four favourite crochet ribbings

IMG_20200409_202601

Sea Shell Phone Case Crochet Pattern

IMG_20200408_120956

Uncategorized

My four favourite crochet ribbings

About 20 years ago when I learned crochet in school, we were told that ribbing can be only knitted and not crocheted. Luckily things are different now and there are plenty of methods to crochet ribbing. Here I am writing about my four ribbings.

IMG_20200409_203012

1. Single crochet ribbing

This is the easiest and the most popular method. This kind of ribbing will look good on smaller hats, baby clothes and everything, where you are going to make a narrow ribbling stripe.

How to:
Ch
Round 1: single crochet in all stitches
Every further round: single crochet in a back loop of a stitch of the previous round.

Examples:

IMG_20180312_210108

2. Double crochet ribbing

This is a broader ribbling that will save you a lot of time. Would be perfect for bigger things: scarfs, oversized mittens and beanie bodies.

How to:
Ch
Round 1: double crochet in all stitches
Every further round: double crochet in a back loop of a stitch of the previous round.

Examples:

IMG_20181112_155047

IMG_20191229_165524


3. Half  double crochet ribbing

This is very elegant, knitted-looking ribbling. Looks especially good on gloves, or in a combination with sophisticated stitches and designs.

How to:
Ch
Round 1: Half  double crochet in all stitches
Every further round: Half  double crochet in a loop below next stitch of the previous round.

IMG_20200409_203753

Examples:

IMG_20180205_133306

4.Front-back post double crochet ribbing

This ribbling can be stretched much better that all other types and it looks very cozy. The method is used a lot in cardigans, socks and ear warmers.

How to:
Ch
Round 1: Double crochet in all stitches

Every further round: front post double crochet (basically, a regular double crochet which goes through and around the double crochet of the previous round) in the next stitch, back post double crochet (the same idea as the front one, but the hook goes around the double crochet from the back side) in the next stitch. Keep going until the end of the round and take care that a back post double crochet goes on the front post double crochet of the round before (and the other way around).

IMG_20191011_155151

Examples:

IMG_20200202_130503IMG_20180210_165608

Did you like the article?
Have a look at my other patterns, maybe you will find something you like there! And don’t forget to check out my Instagram @nicecrocheting!

You might also like:

Rainbow – We are Staying Home! Free Crochet Pattern

IMG_20200404_140658

Coastal Style Smartphone Case Crochet Pattern

IMG_20200326_132906

Uncategorized

Sea Shell Smartphone Case Crochet Pattern

If we cannot go to vocations, we can bring vocations home! Have a look at my sea shell smartphone case inspired by my memories of waves and shells that are laying around on sand every morning… Oh, I miss being on a coast so much! Well, back to the case: I have also made a small hole for the phone on button and a small “window” for checking the time (that was a request of my dear husband who hates arm watches 🙂

IMG_20200408_143630

Materials:

  • 3.5 mm crochet hook
  • recommended for the hook yarn of beige, blue, brown colours
  • scissors

Abbreviations:

  • ch – chain
  • st – stitch
  • sl st – slip stitch
  • sc – single crochet
  • hdc – half double crochet
  • shell – shell st (5 dc in one st)
  • dc – double crochet
  • (…) X 10 – repeat “…” 10 times

IMG_20200408_110000

Pattern:

Note:

  1. The case was made for a smartphone that measures 150 mm x 76 mm x 8.6 mm.
  2. We crochet around, from the bottom to the top, every Round we join with sl st and every Round (except for the Round 1) starts with 1 ch which are not counted as a st!
  3. We make a small hole for a button to be able to switch on the phone in the case and a bigger window for seeing the watch

Blue yarn: 17 ch
Round 1: 3 sc in the second from the hook st, sc in next 12 st, 3 sc in the next st, sc in next 12 st (28)
Round 2: dc in all st (30)
Round 3, beige yarn: (sc, skip 2 st, shell in next st, skip 2 st) X 5 (30)
Round 4, brown yarn: sc in all st (30)
Round 5, blue yarn: 2 ch, 2 dc in the same st, (shell in the st between two next shells of the previous round, sc in the central dc of the next shell of the previous round) X 4, 3 dc in the first st of the round, join with sl st (30)

Round 6, brown yarn: sc in all st, Note: in the sc of  the previous round insert the hook in the st of the round before. This way the bround yarn will cover the sapce between the shells (30)

Round 7, beige yarn: sc in the same st (shell in the st between two next shells of the previous round, sc in the central dc of the next shell of the previous round) X 5, join the round with sl st (30)

Round 8, brown yarn: sc in all st, Note: in the sc of  the previous round insert the hook in the st of the round before. This way the bround yarn will cover the sapce between the shells (30)

Rounds 9-16: repeat Rounds 5-8 after each other (30)

IMG_20200408_110226

Note: if you do not need spaces for the on button and for the watch, keep crocheting until the wished size is reached. Otherwise follow further instructions:

Round 17, blue yarn: 2 ch, 2 dc in the same st, (shell in the st between two next shells of the previous round, sc in the central dc of the next shell of the previous round) X 4, 3 dc in the last st, change to brown yarn, 1 ch, turn (30) – here will be a space for the phone on button.

Round 18: crochet in the other direction: repeat the Round 6, do not join the Round. Change to beige yarn, 2 ch, turn (30)

Round 19, (shell in the st between two next shells of the previous round, sc in the central dc of the next shell of the previous round) X 5, join the round with sl st (30)

Round 20: repeat Round 6 (30)

Fasten off.

Round 21, blue: Insert the hook in 11th st of the round (space between 2nd and 3rd shells) and crochet 4 more shells and following sc’s, change to brown yarn, 1 ch, turn (20)

Now we continue crocheting only on this part of the case

Round 22, brown: sc in all st, Note: in the sc of  the previous round insert the hook in the st of the round before. This way the brown yarn will cover the sapce between the shells, change to the next colour, 2 ch, turn (20)

Round 23, beige: ch sc in the same st, (shell in the st between two next shells of the previous round, sc in the central dc of the next shell of the previous round) X 3, 3 dc in the last st of the round, change to brown yarn, 1 ch, turn (20)

Round 24: sc in all st, Note: in the sc of  the previous round insert the hook in the st of the round before. This way the brown yarn will cover the sapce between the shells, change to the next colour, 10 ch, sl st to the first st of this round (30)

Round 25, beige yarn: repeat Round 5 (30)

Fasten off, cut the yarn and weave in all ends.


Crochet around the inside part of the window with the blue yarn using hdc. Fasten off, cut the yarn and weave in all ends.

IMG_20200408_120956

Did you like to crochet with this tutorial?
Have a look at my other patterns, maybe you will find something you like there! And don’t forget to check out my Instagram @nicecrocheting!

You might also like:

Rainbow – We are Staying Home! Free Crochet Pattern

IMG_20200404_140658

Coastal Style Smartphone Case Crochet Pattern

IMG_20200326_132906

Uncategorized

Rainbow – We are Staying Home! Free Crochet Pattern

Materials:

  • 6 mm crochet hook
  • recommended for the hook yarn (well, you know the colours)
  • scissors
  • sewing needle

Abbreviations:

  • ch – chain
  • st – stitch
  • sl st – slip stitch
  • dc – double crochet
  • dinc – in this case: 2 double crochet in 1 st
  • (…) X 10 – repeat “…” 10 times

IMG_20200403_195502

The Pattern

Rainbow:

Note: every round starts with 2 ch which are not counted as a st in the pattern! First dc make in the same st as the ch. Turn after every round. Every round start with a new colour (first Round – violet, last – red).

Start with violet yarn.
24 ch + 2 turning st

Round 1: dc in the 3rd ring from the hook, dc in next 2 st, dinc in next st, (dc in next 3 st, dinc) X 5 (30)
Round 2: (dc in next 4 st, dinc) X 6 (36)
Round 3: (dc in next 5 st, dinc) X 6 (42)
Round 4: (dc in next 6 st, dinc) X 6 (48)
Round 5: (dc in next 7 st, dinc) X 6 (54)
Round 6: (dc in next 8 st, dinc) X 6 (60)
Round 7: (dc in next 9 st, dinc) X 6 (66)

Fasten off, cut the yarn.

IMG_20200403_223210

Cloud (make 4, use white yarn):
15 ch
Round 1: 6 dc in the 3rd ring from the hook, dc in next 11 st, 6 dc in next st (the st will go around the ch), dc in next 11 st, sl st (34).
Round 2: dc in next st, dinc in next 4 st, dc in next 13 st, dinc in next 4 st, dc in next 12 st, sl st (42). Fasten off and cut the yarn (for two of the 4 clouds leave a long tail for sewing). Weave in short tails.

IMG_20200404_140858

Sew the two pairs of clouds together inserting the ends of the rainbow inside.

Finished! Now you can hang it on your balcony or in the backyard and others will see that you are staying home!

Stay home, be safe and take care!

IMG_20200404_140454

Did you like to crochet with this tutorial?
Have a look at my other patterns, maybe you will find something you like there!

You may also like:

Zero Waste Crochet

IMG_20180202_153126

Crochet and Lyme Disease

IMG_20200331_192843

Crochet Reusable Cosmetic Pads

IMG_20200321_144042